Connect Quest Portal to Claude and ChatGPT
Quest Portal has an MCP server, a secure link that lets an AI assistant such as Claude or ChatGPT work in your Quest Portal account. Once connected, you can ask in your own words ("Create an NPC for the tavern keeper", "Move Thursday's session to 7:30") and the assistant reads and updates your campaigns, characters, notes, scenes, schedules and dice skins.
Available with Core and Pro, including the free trials, on any plan of Claude or ChatGPT that supports custom connectors. With Core, your assistant can read your campaigns. With Pro, it can also make changes.
Who can use it
Pro members: your assistant can read and change everything in all your campaigns. The 30-day Pro trial counts.
Core members: your assistant can read your campaigns, characters and sheets, notes, scenes, schedules, past sessions and invite links, and search this documentation. Making changes, searching your notes, library or music, and the dice skin tools need Pro. The Core trial counts.
Members of a Pro campaign: if you don't have Pro yourself, but another member of a campaign you're in has Pro, your assistant can work in that campaign and nowhere else. Creating new campaigns and the dice skin tools still need your own Pro; Pro shared in a campaign doesn't cover them.
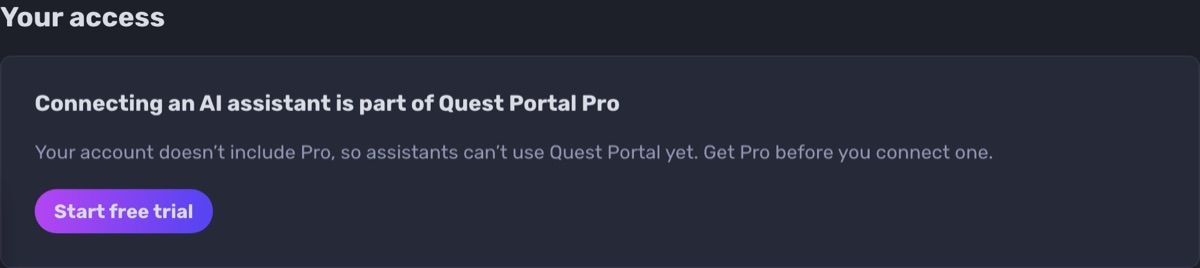
Everyone else: you can add the connector and sign in, but the assistant can't read or change your data until you have Core or Pro. Start a trial or choose a plan first.
Your access is shown at the top of https://app.questportal.com/settings/mcp.
What you can ask it to do
The assistant acts as you, so it can only open campaigns, characters and notes you can already open, and only the campaign owner can change campaign-wide things like the schedule.
With Core, your assistant can look things up but not change them. Everything below that creates, changes, searches or deletes needs Pro.
Campaigns
Create a campaign, rename it, or rewrite its description. Creating a new campaign needs your own Pro.
Change the campaign's profile picture, cover image and cover position.
See your campaign's active invite links.
Search the books in your campaign library and quote the exact page.
Characters
Create player characters, hidden NPCs or claimable characters, from a blank sheet or a character sheet template (including Call of Cthulhu 7e).
Change a character's name, tagline, portrait or visibility to players.
Read and fill in character sheet tabs, and update Call of Cthulhu 7e characteristics, skills and weapons.
Notes
Write new notes (private or shared with the campaign) and rewrite existing ones.
Create note folders and move notes between them.
Add images to a note.
Search across your campaign notes.
Scenes and music
Create scenes from an image, rename them and change their description or background.
Organize the scene bar into folders, and add scenes from your gallery.
Find tracks in the Quest Portal music library, add your own MP3s, and reorder or remove a scene's soundtrack.
Sessions and scheduling
Set up or change the campaign's recurring session schedule.
List upcoming sessions, see who is going, and answer Going / Not going for yourself.
Get a calendar file (.ics) for a session.
Read past sessions: attendance, recaps and a timeline of scenes and dice rolls.
Dice skins
Design a new dice skin, import one, equip it or delete it. These tools need your own Pro; Pro shared in a campaign doesn't cover them. See Dice to learn how dice skins appear when you roll.
Help
Search this documentation to answer "how do I…" questions.
Connect Claude (web and desktop)
You need to do this once, on a computer. After that, Quest Portal also works in the Claude mobile apps.
In Quest Portal, open https://app.questportal.com/settings/mcp, choose Claude, and click Copy next to mcp.questportal.com/mcp.
In Claude on the web or in the desktop app, open Customize, then Connectors.
Click to add a custom connector, name it "Quest Portal", paste the link https://mcp.questportal.com/mcp, and click Add. Leave the advanced OAuth settings empty.
Click Connect. A Quest Portal page opens.
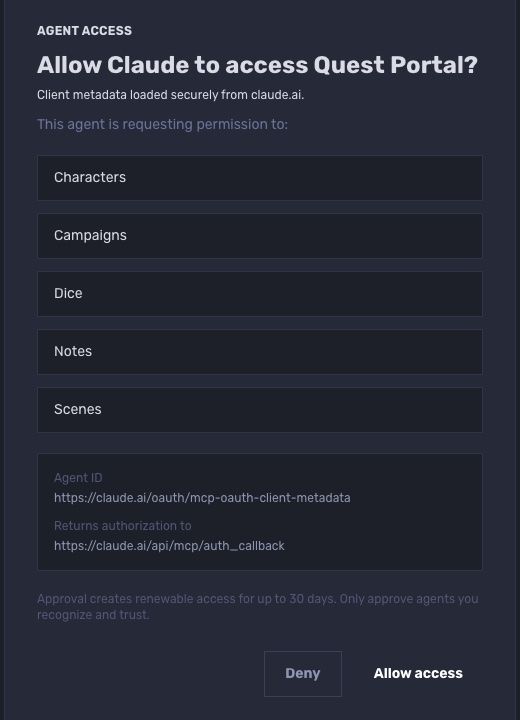
Sign in to Quest Portal if asked. The page reads "Allow Claude to access Quest Portal?" and lists what Claude will be able to use: Characters, Campaigns, Dice, Notes and Scenes.
Click Allow access. You're returned to Claude, and the connector shows as connected.
In a new chat, make sure Quest Portal is turned on in the chat's tools menu, then ask away. Claude asks for your approval before it changes anything, unless you tell it to always allow a tool.
Connect Claude Code
In a terminal, run this command:
Then start Claude Code, type /mcp, choose questportal and sign in. Your browser opens the same Quest Portal approval page; click Allow access.
Connect ChatGPT
You need to do this once, in ChatGPT on the web. Adding your own app requires ChatGPT's developer mode, which depends on your ChatGPT plan and, on work plans, on your workspace admin.
In Quest Portal, open https://app.questportal.com/settings/mcp, choose ChatGPT, and click Copy next to mcp.questportal.com/mcp.
In ChatGPT on the web, open Settings, then Apps (called Apps & Connectors on some plans).
Under Advanced settings, turn on Developer mode.
Click Create (or Add custom MCP server), name it "Quest Portal", paste https://mcp.questportal.com/mcp, and choose OAuth for authentication. Keep the default client settings.
Click Create. A Quest Portal page opens.
Sign in to Quest Portal if asked. The page reads "Allow ChatGPT to access Quest Portal?". Click Allow access.
In a new chat, pick Quest Portal from the chat's + menu and ask away. Depending on your ChatGPT settings, it may ask you to confirm before it writes.
Other assistants
Any assistant that supports remote MCP servers with OAuth can connect. Add https://mcp.questportal.com/mcp as a custom connector or MCP server, then approve access on the Quest Portal page. For better results, give your assistant the Quest Portal agent skill, linked from https://app.questportal.com/settings/mcp.
Credits
Using Quest Portal through Claude or ChatGPT does not spend your Quest Portal credits. The AI runs on Claude's or ChatGPT's side and counts toward your plan there. Quest Portal credits are only used by AI features inside Quest Portal, such as the Game Master Assistant and image generation. See What are Credits?
What it can access
It acts as you. The assistant has the same access you have: campaigns you're in, characters you own or can edit, and notes you can open. It can't see other people's private notes or other players' accounts.
You approve it. Nothing is shared until you click Allow access. The approval page lists what the assistant asks to use (Characters, Campaigns, Dice, Notes, Scenes).
It doesn't last forever. Approval gives renewable access for up to 30 days. If you stop using it, connect again.
It can't buy anything or change your account. It can't make purchases, change your plan, or see your payment details.
It edits, so check its work. The only thing it deletes outright is a dice skin you created, but it can rewrite notes and character sheet tabs. Review what it changed, especially in shared campaign notes.
What leaves Quest Portal: whatever the assistant reads (for example a note it searched) is sent to Claude or ChatGPT to answer you, and is handled under their terms and privacy settings.
See and disconnect connected assistants
Open https://app.questportal.com/settings/mcp. Under Connected assistants you see each assistant you approved, what it can use, when you approved it and when it was last active.
Click Disconnect next to the assistant.
Confirm in the "Disconnect assistant?" dialog.
The assistant loses access within 15 minutes. You can also remove the connector in Claude or ChatGPT, but disconnecting in Quest Portal is what cuts off its access. To use it again, connect it again from Claude or ChatGPT.
Where it appears
Web: your profile menu > Account settings > Connect to MCP, or https://app.questportal.com/settings/mcp.
Mobile app: Settings > AI assistants > Connect to MCP shows your access, the setup steps (with Email me these steps, so you can finish on a computer) and your connected assistants.
Troubleshooting
The assistant says a tool needs Quest Portal Pro. With Core, your assistant can read your campaigns but can't make changes or run searches. Upgrade to Pro, or use a campaign where another member has Pro. Without a plan or trial, start one at https://app.questportal.com/settings/mcp, then try again.
"Authorization could not be completed." Go back to Claude or ChatGPT and connect again. Make sure you're signing in to the Quest Portal account you want the assistant to use.
The assistant doesn't use Quest Portal. Turn Quest Portal on in that chat's tools menu (Claude) or pick it from the + menu (ChatGPT), and mention Quest Portal in your request.
It worked before and now it doesn't. You may have disconnected it, or it hasn't been used for 30 days. Connect it again.
It says it can't change something. Some changes are only for the campaign owner (for example the schedule, the campaign name and photos, invite links), and characters must be ones you can edit.
A change doesn't show up. Refresh the page in Quest Portal. If the assistant says another edit happened at the same time, ask it to read the note or sheet again and retry.